This article will explain how to add any WooCommerce product to your listings to allow site visitors to buy or book products directly from the listings. Step 1-3 are only required when setting up your website. Steps 4-5 are required every time you create a new product.
Install and Activate WP Job Manager – Products
Ensure that you have the WP Job Manager Products plugin active. This plugin is what will link the listings to the products. Also ensure, that you have WooCommerce active.
Set Product Visibility Under Listings > Settings > Products
Under Listings > Settings > Products choose whether you want to enable listing owners to be able to select only their own products or any products available on the site.
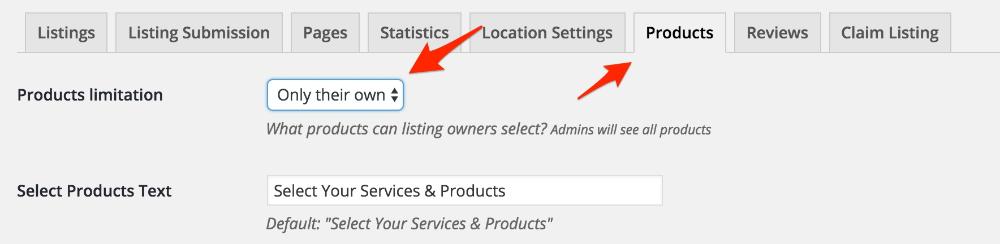
Select Only Their Own Products
If you choose to enable customers to select “O nly Their Own” products, you should ideally have the WooCommerce Product Vendors plugin installed and activated. With the WooCommerce Product Vendors plugin listing owners can create their own products as well as sell those products on their listings.
Select All Products
When you select ” All” products, listing owners will be able to select any products that are available/created on site, even if the product does not belong to them. Please note however, this does not mean they will get commission for selling these.
Display Products In the Listings Widget Areas
You can display the products on either the main listings area or the sidebar.
Single Listings Main Area
To display the products on the single listings main area, you will need to configure the Listings: Products Main widget.
Single Listings Sidebar
To display the products on the single listings main area, you will need to configure the Listings: Products (Sidebar) widget.
Displaying Bookable Products
If you are planning on allowing bookings on your website through WooCommerce Bookings, you will then need to configure the Listings: Bookings widget.
Create The Product
To create the actual product that you would like to sell, simply follow the regular process for creating a product under Products > Add Product. For more details on this, please refer to the Adding and Managing Products documents.
If you would like your listing owners to create their own products, you must first make sure that they are vendors on your site. Once they are vendors, they can then create their own products.
Link Product to Listings
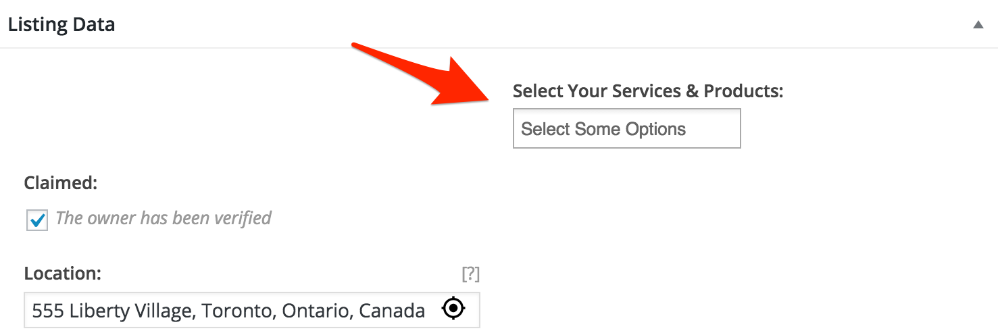
If the user has products available to pick, a new field will appear on the submission form. Users can then browse through their available products, deals, promotions, bookings and link them to their listing.
Depending on the setting selected in Step 2, users may not have any products to select. If no products are available this field will not be available either.
Listing owners can also add products to their existing listings by editing their listings. If they have products available to select, they will see a new field on their edit listing form similar to the field above.
Admins can also add products from the backend by editing the listings.